

Introducing the Tompouce.
The Dutch version of a global pastry icon.

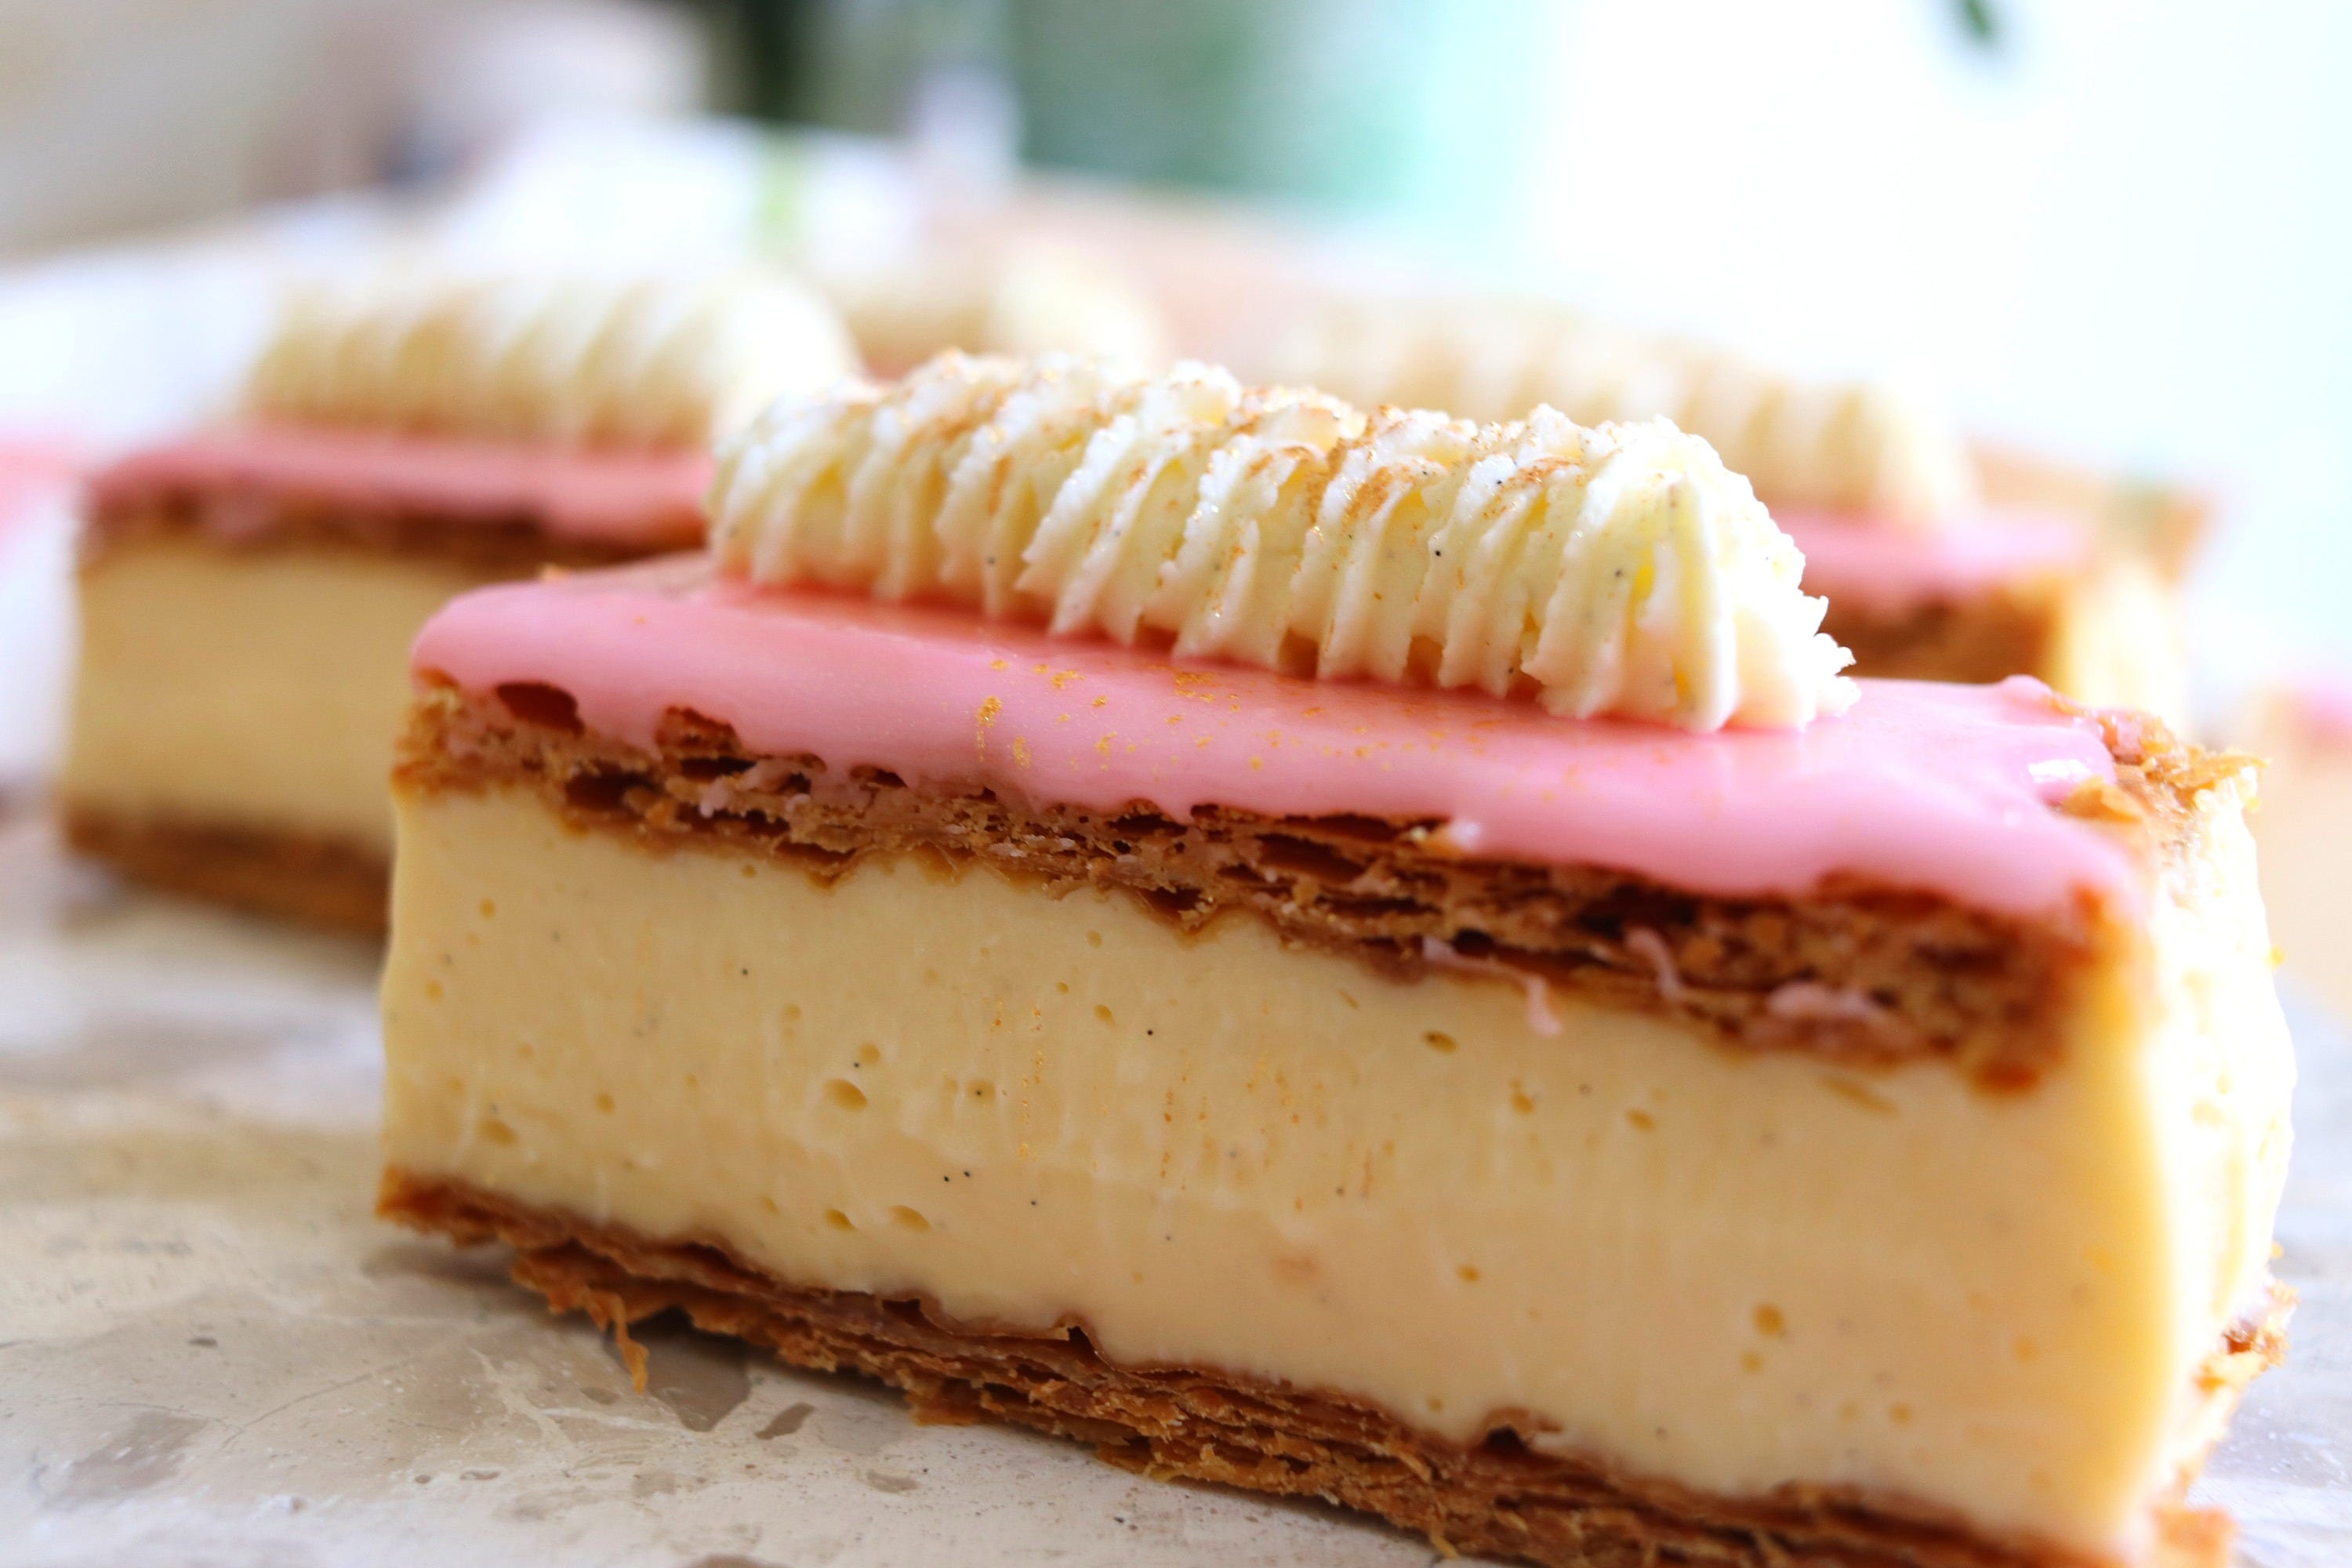
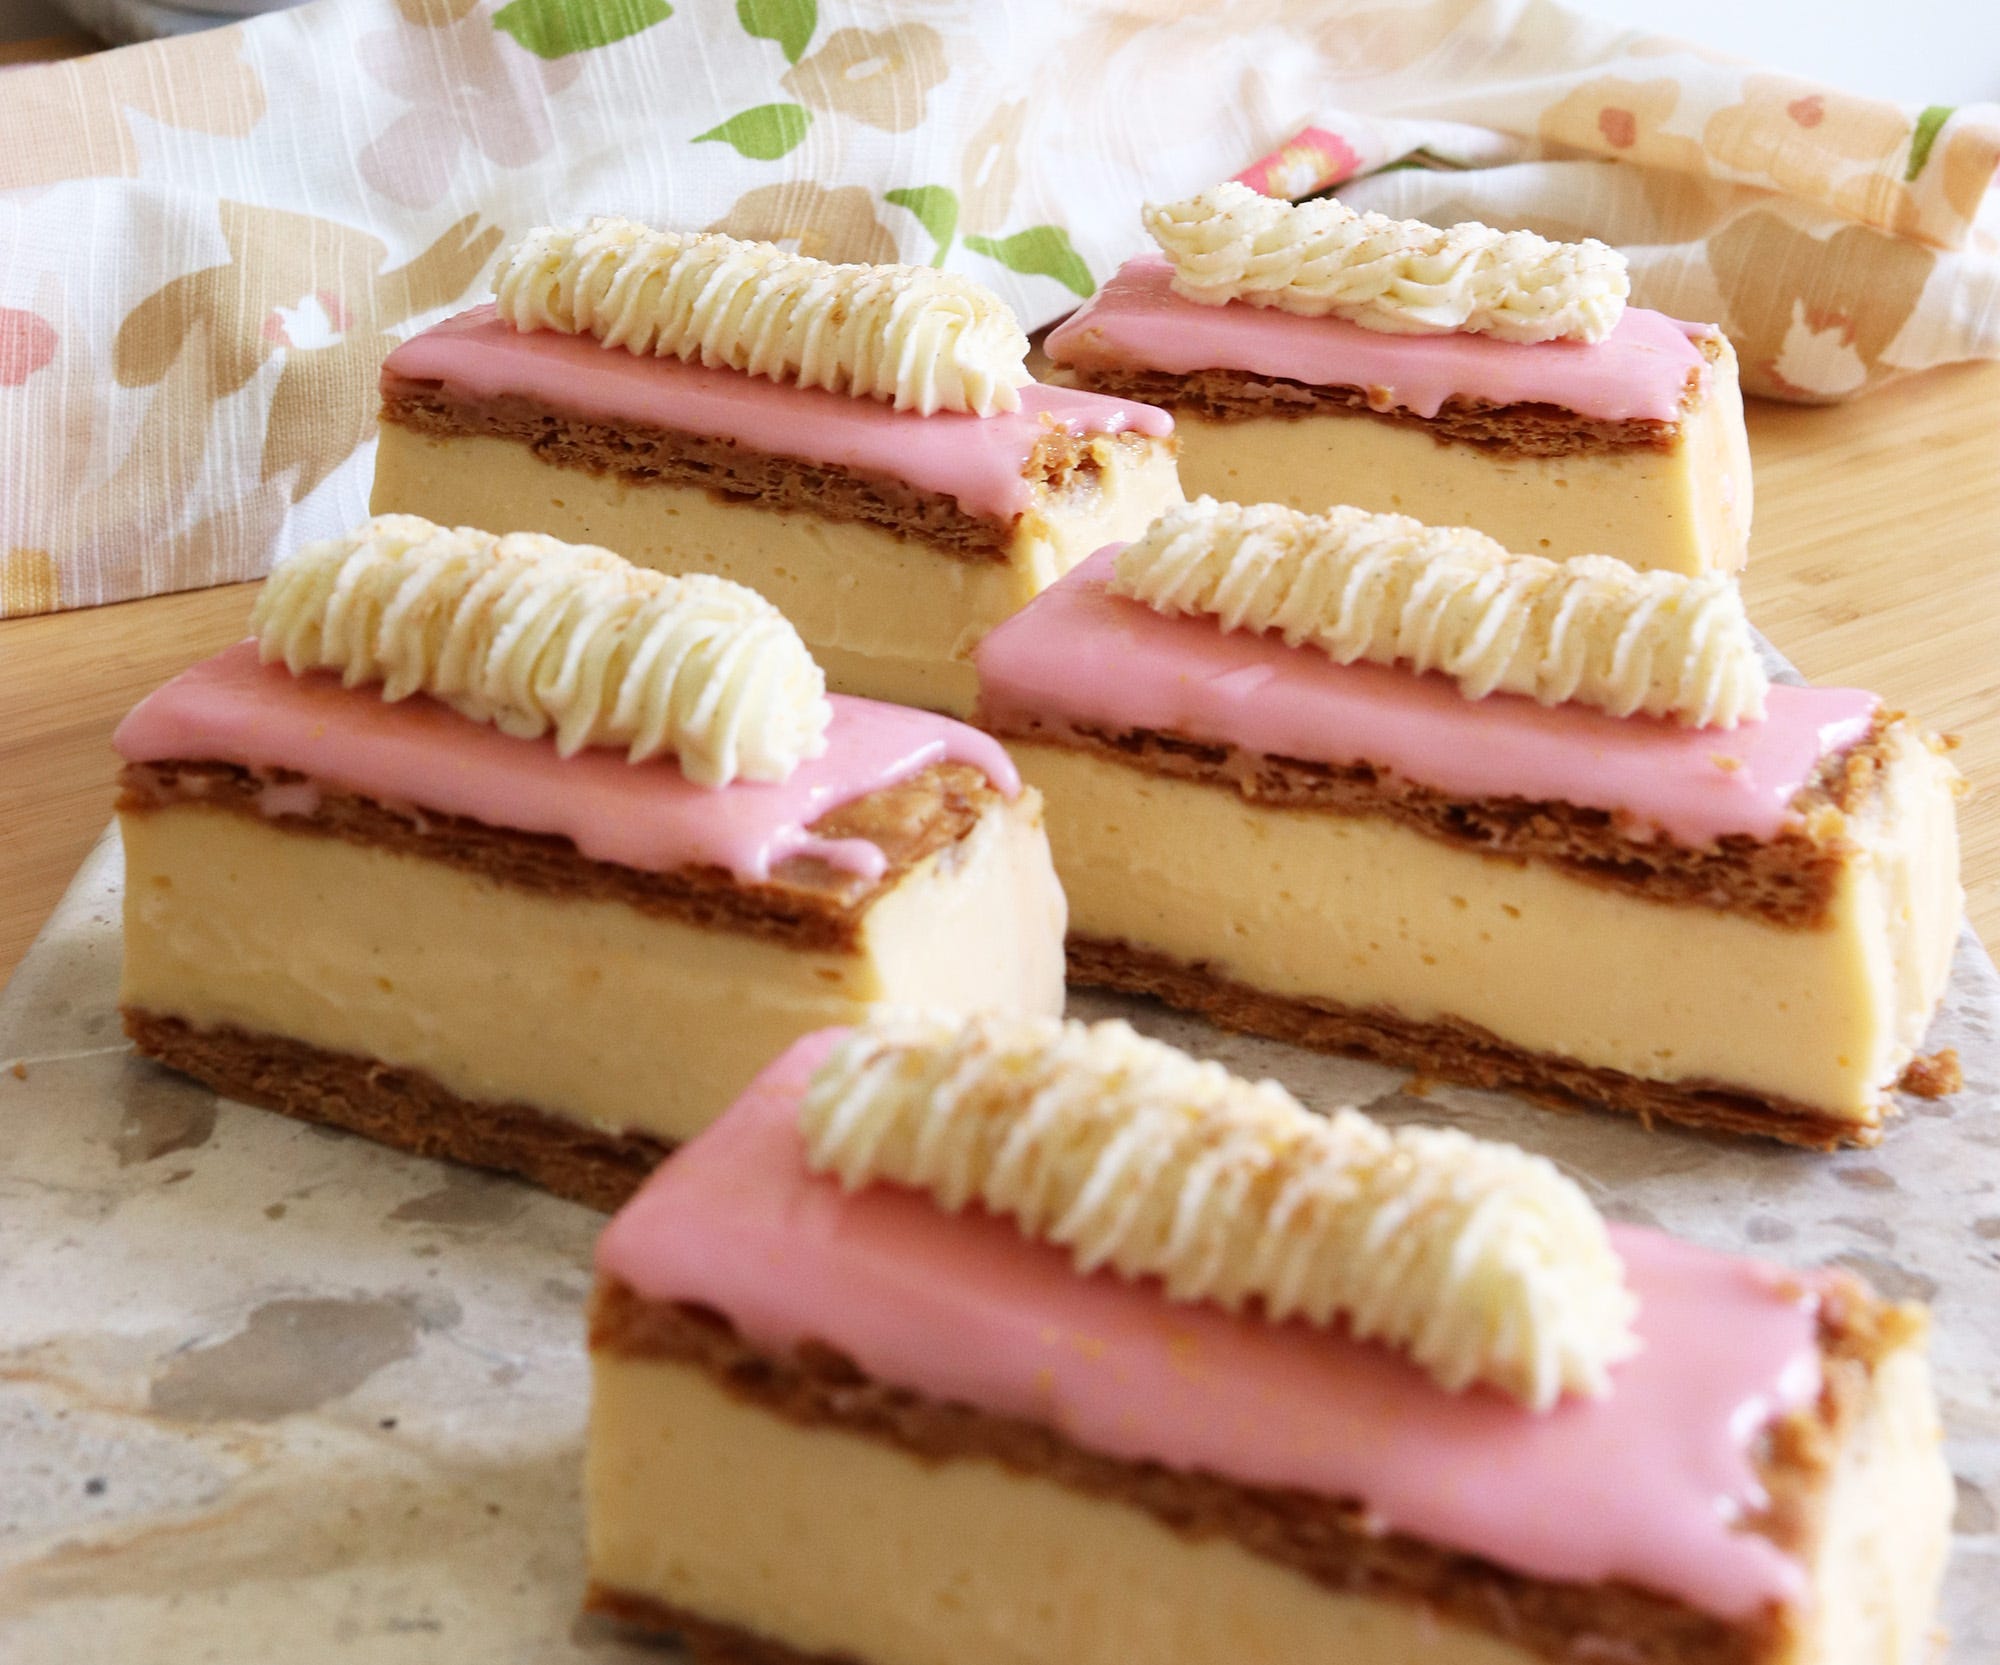
Deeply golden puff pastry and velvety vanilla custard. Two perfect dessert elements that, when combined, become one of the most iconic pastries the world has ever seen.
A mille feuille in France. A vanilla slice in Australia. Or a Tompouce, which I was introduced to in The Netherlands earlier this year. But whatever you call it where you’re from, it’s a staple of the bakery scene, much like Marina Prior at Carols by Candlelight (I appreciate that this is a deeply Australian reference, but IFYKYK).
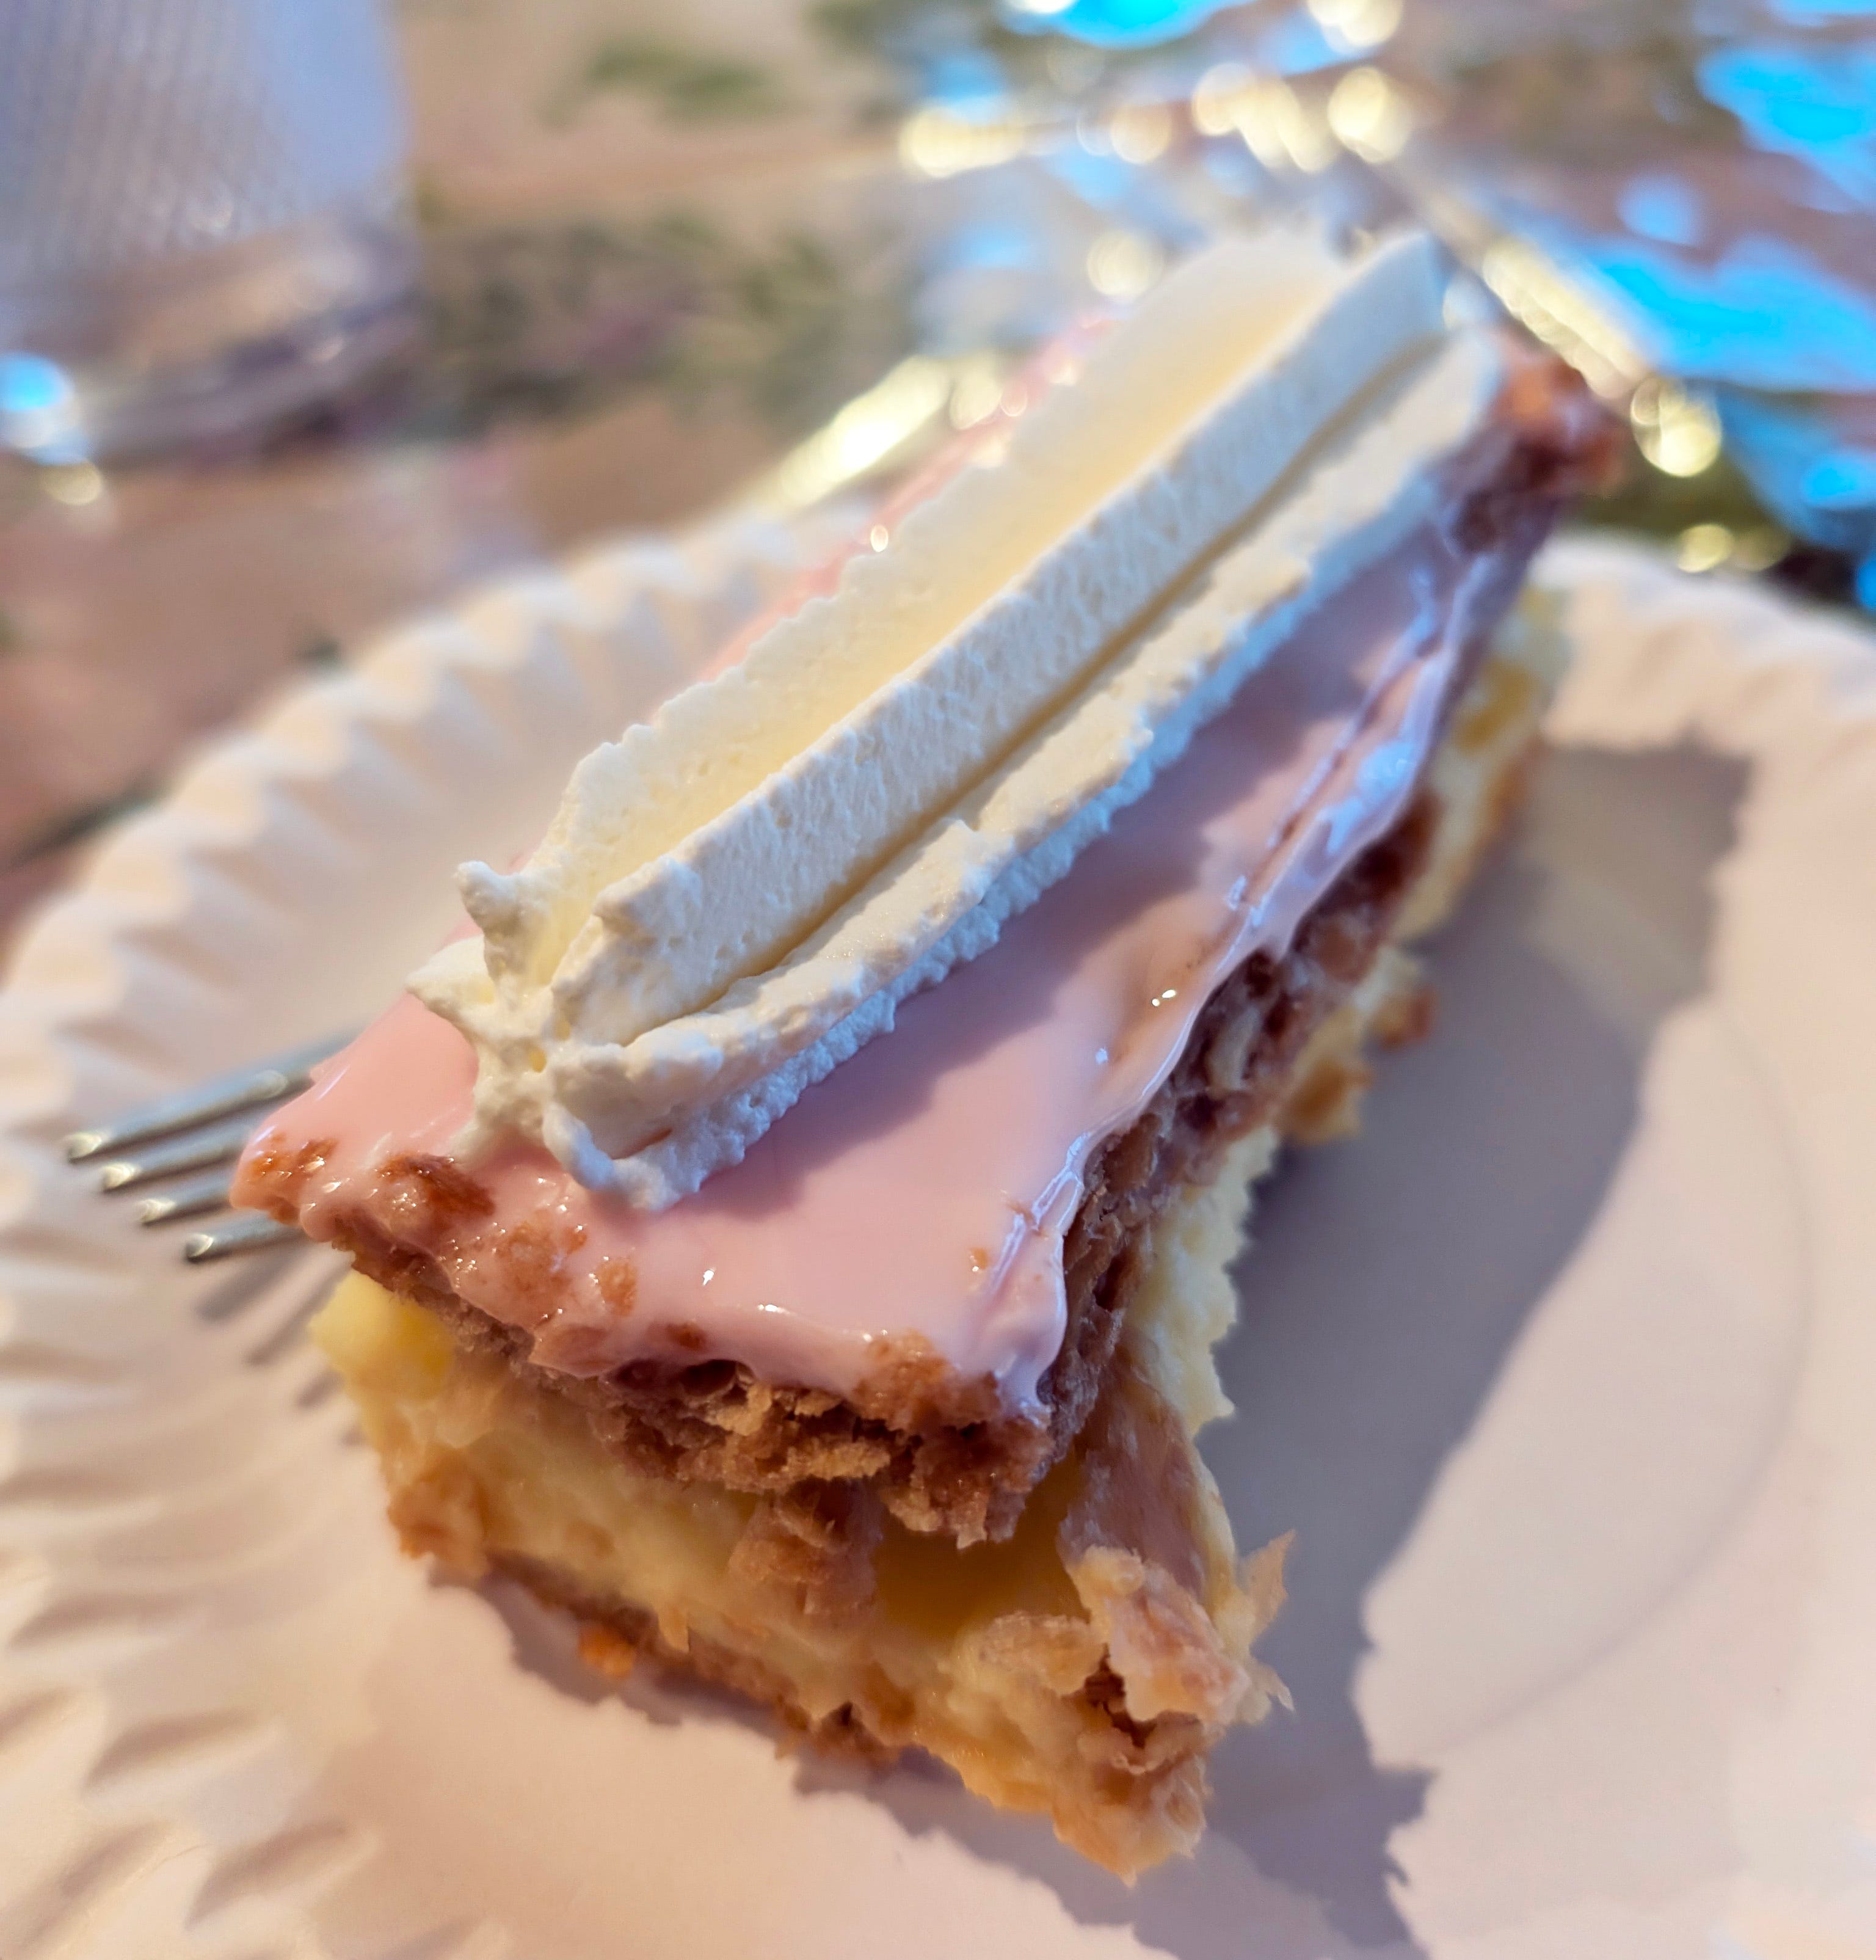
The Tompouce is very close to the Australian vanilla slice I loved growing up. Pastry and custard topped with a glorious (and mandatory, in my book) sticky-sweet icing. I have seen some bakeries and recipes forgo the sticky icing for a dusting of icing sugar, which I just can’t get around. While the icing can be a messy business, and make slicing the pastry a bit more challenging, the payoff is, in my option, a far more balanced-tasting dessert. And let’s be honest, the mess and sticky fingers are part of the joyful magic of this dessert!


I was introduced to the Tompouce earlier this year when I stayed with my cousins in The Netherlands. It was spoken about with a level of reverence reserved for the most prized of desserts. It is, after all, a dessert that is generally only served for the biggest celebrations in The Netherlands. So for it to be the centrepiece of a family feast marking our visit was quite the honour!
My cousin, Ruud, and I collected a box of Tompoucen (the plural form of Tompouce) from the local bakery, Brood en Banket, in the morning in preparation for a family feast that evening. And let me tell you, in between showing Nick and I around Rotterdam, the Tompouce was the hot topic of discussion for much of the day! We discussed the best ways to eat a Tompouce (yes, there are different methods!). Multiple text messages were sent and phone calls were made making sure the brave soul (Ruud’s wife, Jeanette) transporting the box of Tompoucen to dinner didn’t forget to pick them up on her way. The anticipation had more momentum than the lead up to the release of Wicked Part 1!

When the time for dessert finally arrived, it did not disappoint. The classic elements were done perfectly, with a pink sticky-sweet icing and a swirl of Chantilly cream piped on the top. Pastry heaven. I knew immediately I had to recreate this at home.
Like many classic pastries, this is made up of a handful of common ingredients used in precise ways. The recipe that follows is quite detailed, but necessarily so. It isn’t a recipe to do in a rush. Rather, it’s one to get lost in when you have some time to test your baking skills.
Your investment of patience and precision will result in a stunning dessert that will stop any show!
A couple of notes before you start:
If you do want to save some time, you can skip the homemade rough puff pastry and use frozen sheets from the supermarket.
I used a 20cm square tin for my Tompouce.
To ensure the pastry rises evenly, I bake each pastry sheet between two 25cm x 35cm baking trays. You’ll need four baking trays in total.
The custard recipe below will result in a velvety set custard. However, it was a process of trial and error to nail this element. My first attempt at the custard resulted in quite the runny mess. What I initially thought was set custard, quickly turned into a partially-set custard puddle out of the fridge. On the off chance this happens to you, all is not lost! Do as I did, and swirl the custard and pastry through ice-cream! Either buy a tub of vanilla ice-cream, or make your own no-churn ice-cream.
Recipe – Tompouce
Ingredients
Puff Pastry (make your own, or use two square sheets of frozen puff pastry)
250g plain flour
1 teaspoon caster sugar
1 teaspoon salt
250g unsalted butter, fridge cold, cut into 2cm cubes
10ml white wine vinegar
110ml ice cold water
Custard
800ml full fat milk
140g egg yolks (from about 8 eggs)
110g caster sugar
75g corn flour
75g unsalted butter
2 teaspoons vanilla bean paste
Chantilly Cream
100g thickened (heavy) cream
100g mascarpone
20g icing sugar
½ teaspoon vanilla bean paste
Tiny pinch of salt
Icing
200g icing sugar
30ml water
Pink food gel (I used Soft Pink made by Vivid)
Method
Day 1 - Make the puff pastry
Mix the flour, salt and sugar in a large bowl. Add the cubed butter and toss them around so they are evenly covered in flour.
Use your fingers to start rubbing the butter into the flour, until you have a mix of flattened butter and chunks of butter. These pieces of butter will turn into long, thin streaks of butter in the finished dough, so be careful to not rub the butter in too much.
Make a well in the centre of the bowl and add the vinegar and chilled water. Use your hands to scoop the flour from the sides over the liquid and then gently squeeze the dough together to create a shaggy mess.
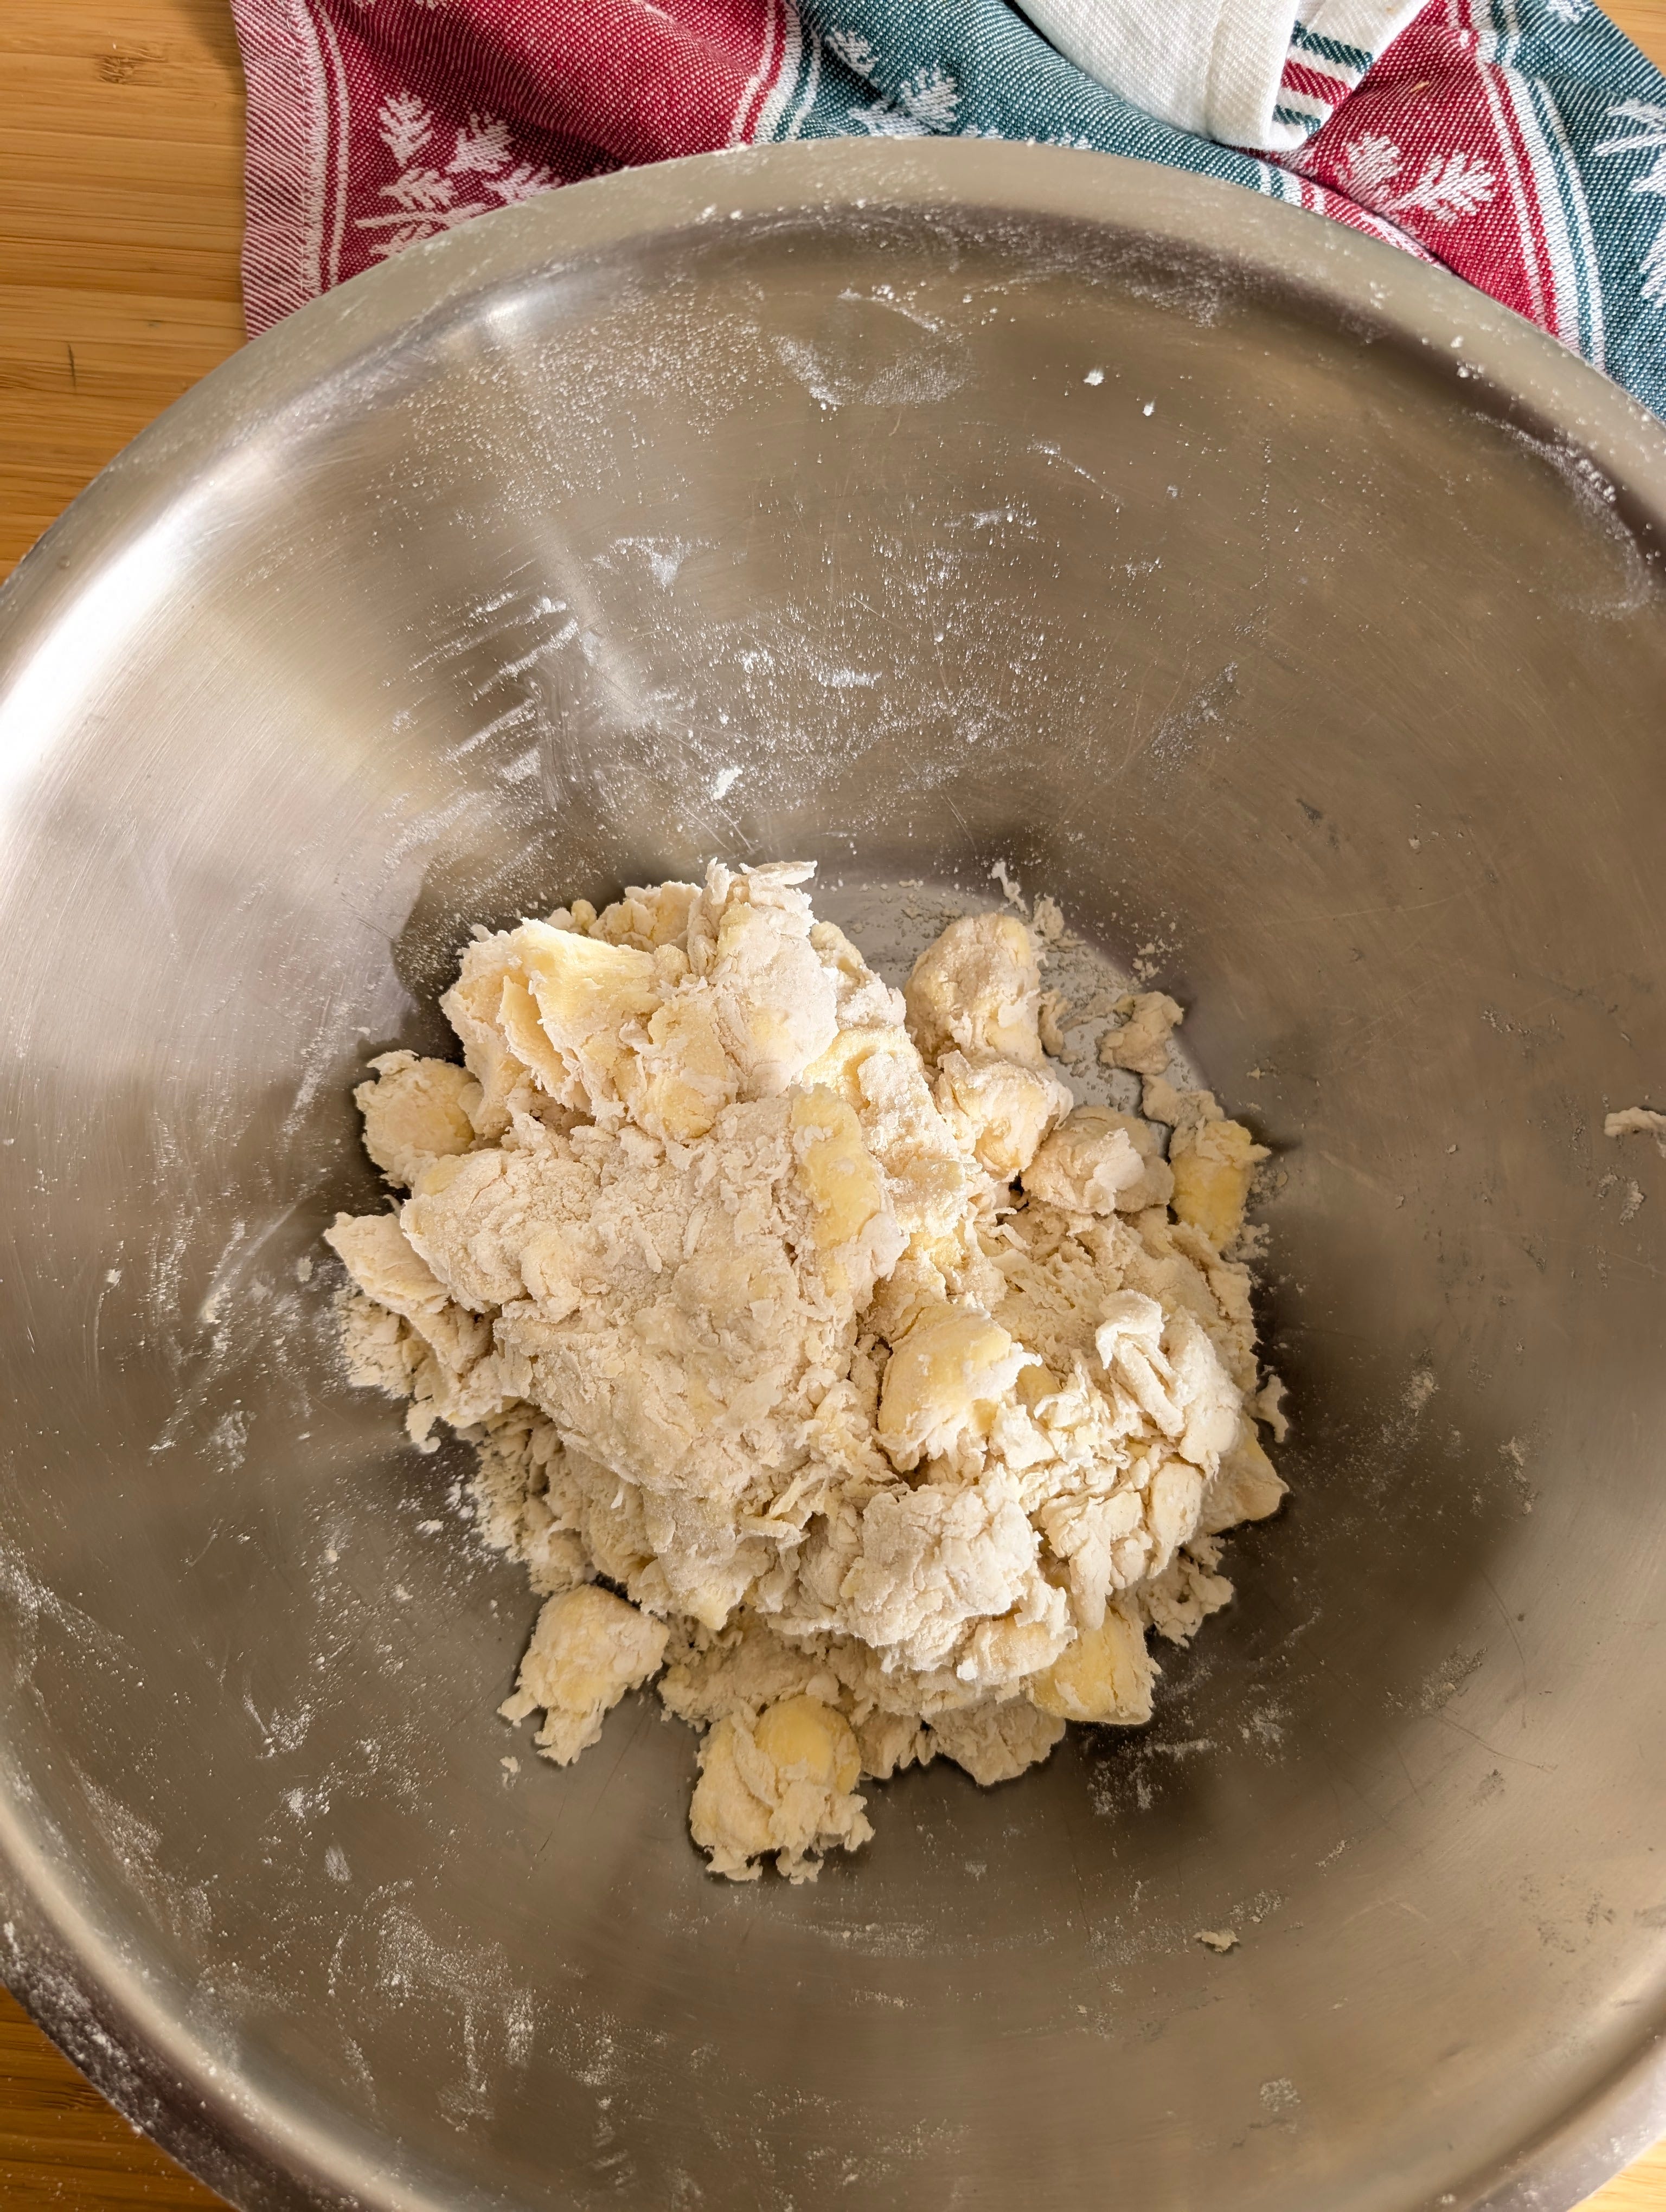
Tip the shaggy mess onto a clean bench and continue to squeeze and knead the dough for a minute or two before shaping into a rough rectangle that just holds together. You still want to see clear chunks of butter in the dough.
See the photos below to see the progress of the pastry coming together between each set of folds
Use the palm of your hand to press the dough into a rectangle that’s about 2cm thick.
Now it’s time for your first fold – and we’re folding into thirds, AKA a letter fold. With a short end facing you, take the end closest to you and fold it two-thirds of the way up the dough and gently press down. Take the other end and fold over to meet the bottom end closest to you and gently press down. Turn the dough 90 degrees and, using a rolling pin, press and roll into a long rectangle. Repeat the folding technique, and then wrap in plastic wrap and chill in the fridge for 10-15 minutes, or in the freezer for 5-10 minutes.
After this brief chill, repeat the roll, fold and turn two more times before chilling again.
If you’re working in a hot kitchen, make sure you chill your dough between every fold, so the butter doesn’t melt into the dough.
Repeat the double roll, fold, turn and chill two more times, so you have done eight roll-and-folds in total. By this time, all the chunks of butter should be layered into the dough, with relatively neat edges.


After the final roll and fold, roll the dough into a rectangle that is roughly 20cm x 12cm and 2-2.5cm thick. Cut the dough in half, creating two squares. Wrap the portions in plastic wrap and put in the fridge to chill for at least 20-30 minutes, or for up to three days. You can also freeze this dough for up to three months.
Day 1 - Roll out the pastry
Take the chilled dough out of the fridge 15 minutes before you’re ready to roll. While you’re waiting, line two baking trays with baking paper.
Lightly flour your bench and roll the dough into a 23cm square.
Remember to lift, turn and flip the dough every couple of rolls, and lightly dust with flour as needed, to ensure the dough doesn’t stick to the bench.
Place the rolled pastry on one of the lined baking trays. Place another sheet of baking paper over the pastry and then top with another tray and chill in the fridge while you roll out the second pastry square. Chill both rolled pastry squares on their trays for at least 30 minutes in the fridge.
Day 1 - Bake the pastry
Preheat the oven to 200 degrees C. Place the chilled trays of dough into the oven, turn down the temperature to 180 degrees C and bake for 40 minutes.
Carefully remove both top trays and top sheets of baking paper, exposing both sheets of pastry. Continue baking them for another 20-30 minutes, or until the pastry sheets are a deep golden brown.
Leave the pastry to cool completely on the tray.
Day 1 - Make the custard
Pour the milk into a medium sized saucepan. Heat over medium, stirring occasionally, until the milk starts to steam and bubble on the sides of the pot. Remove the milk from the heat.
While the milk is heating, whisk the egg yolks, sugar and corn flour until fully combined.
Once the milk is heated, pour half of it into the egg yolks while continuously whisking to avoid scrambling the egg yolks. Once combined, gradually add the remaining milk while whisking.
Pour the custard back into the saucepan and turn the heat to low/medium. Cook the custard for 5-7 minutes, whisking continuously until lusciously thick and glossy, and the cornflour is completely cooked out. It’s fine if the custard starts to bubble. Just make sure you keep stirring!
Remove from the heat and whisk in the butter and vanilla bean paste. Pour the custard through a sieve into a clean bowl. Leave to cool in the bowl, uncovered, for 30-60 minutes, whisking every 5 minutes to ensure a skin doesn’t form on the top.
Day 1 - Assemble the Tompouce, Part 1
Line a 20cm square slice tin with plastic wrap, leaving enough overhang so you can fold it over the top of the assembled Tompouce.
Use a sharp serrated bread knife to trim the pastry sheets to 20cm squares.
Note that the base of some tins are smaller than the opening at the top, so adjust the size of your pastry sheets accordingly.
Place one of the trimmed pastry squares on the bottom of the lined tin.
Pour in the cooled custard over the pastry. Use an offset spatula to evenly spread and smooth the custard. Gently place the remaining trimmed pastry sheet on the custard. Fold the excess plastic wrap over the pastry and chill for at least 5 hours, ideally overnight.
Day 2 - Assemble the Tompouce, Part 2
The next day unfold the plastic wrap and flip the Tompouce out of the tin. Do this by placing a large chopping/bread board on top of the tin, and invert with confidence, like you would to remove a cake from a cake tin.
Gently lift the now upside-down tin and the peel off the plastic wrap. Place an offset spatula next to the Tompouce – you’ll need this at the ready for when you pour the icing.
Day 2 - To make the icing
Place all the icing ingredients into a small saucepan and whisk together until fully combined.
Place the saucepan on a low heat, whisking continuously, until the icing reaches 40-50 degrees C.
With the saucepan in one hand and the prepared spatula in the other, pour the icing over the pastry and use the spatula to help spread the icing. Note, that this icing will set very quickly.
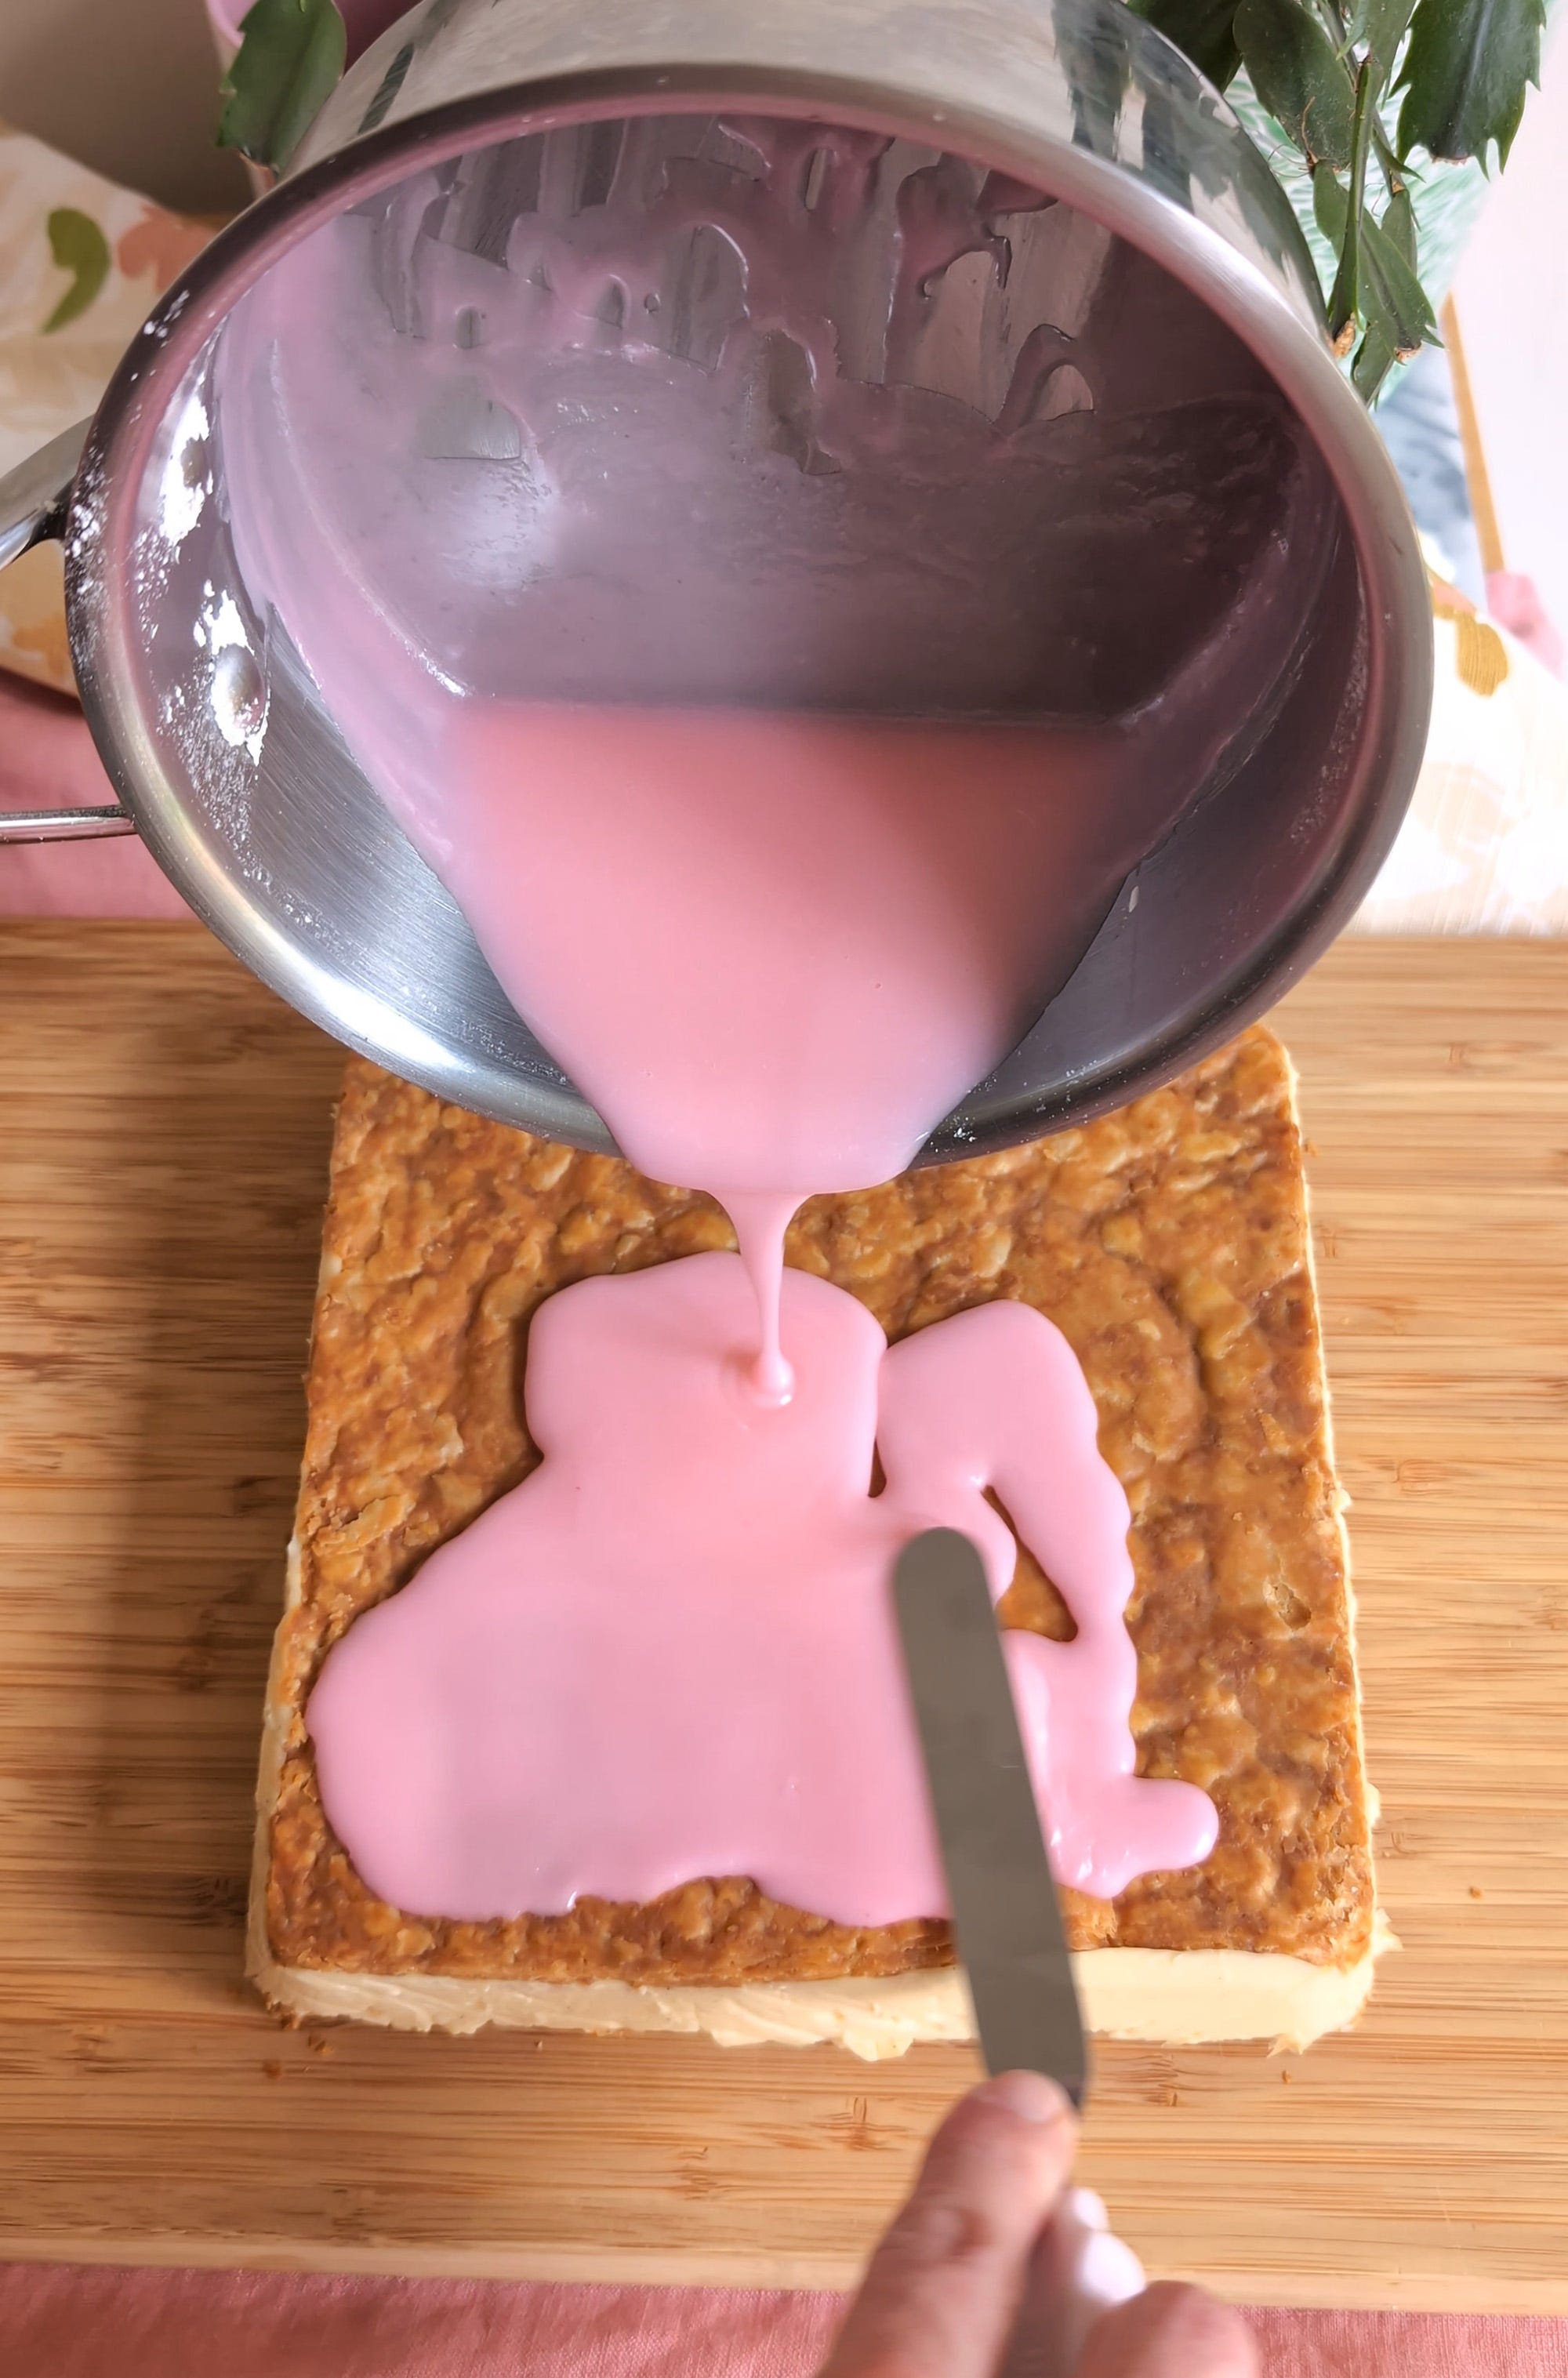
Place the Tompouce into the fridge for 5-10 minutes for the icing to fully set.
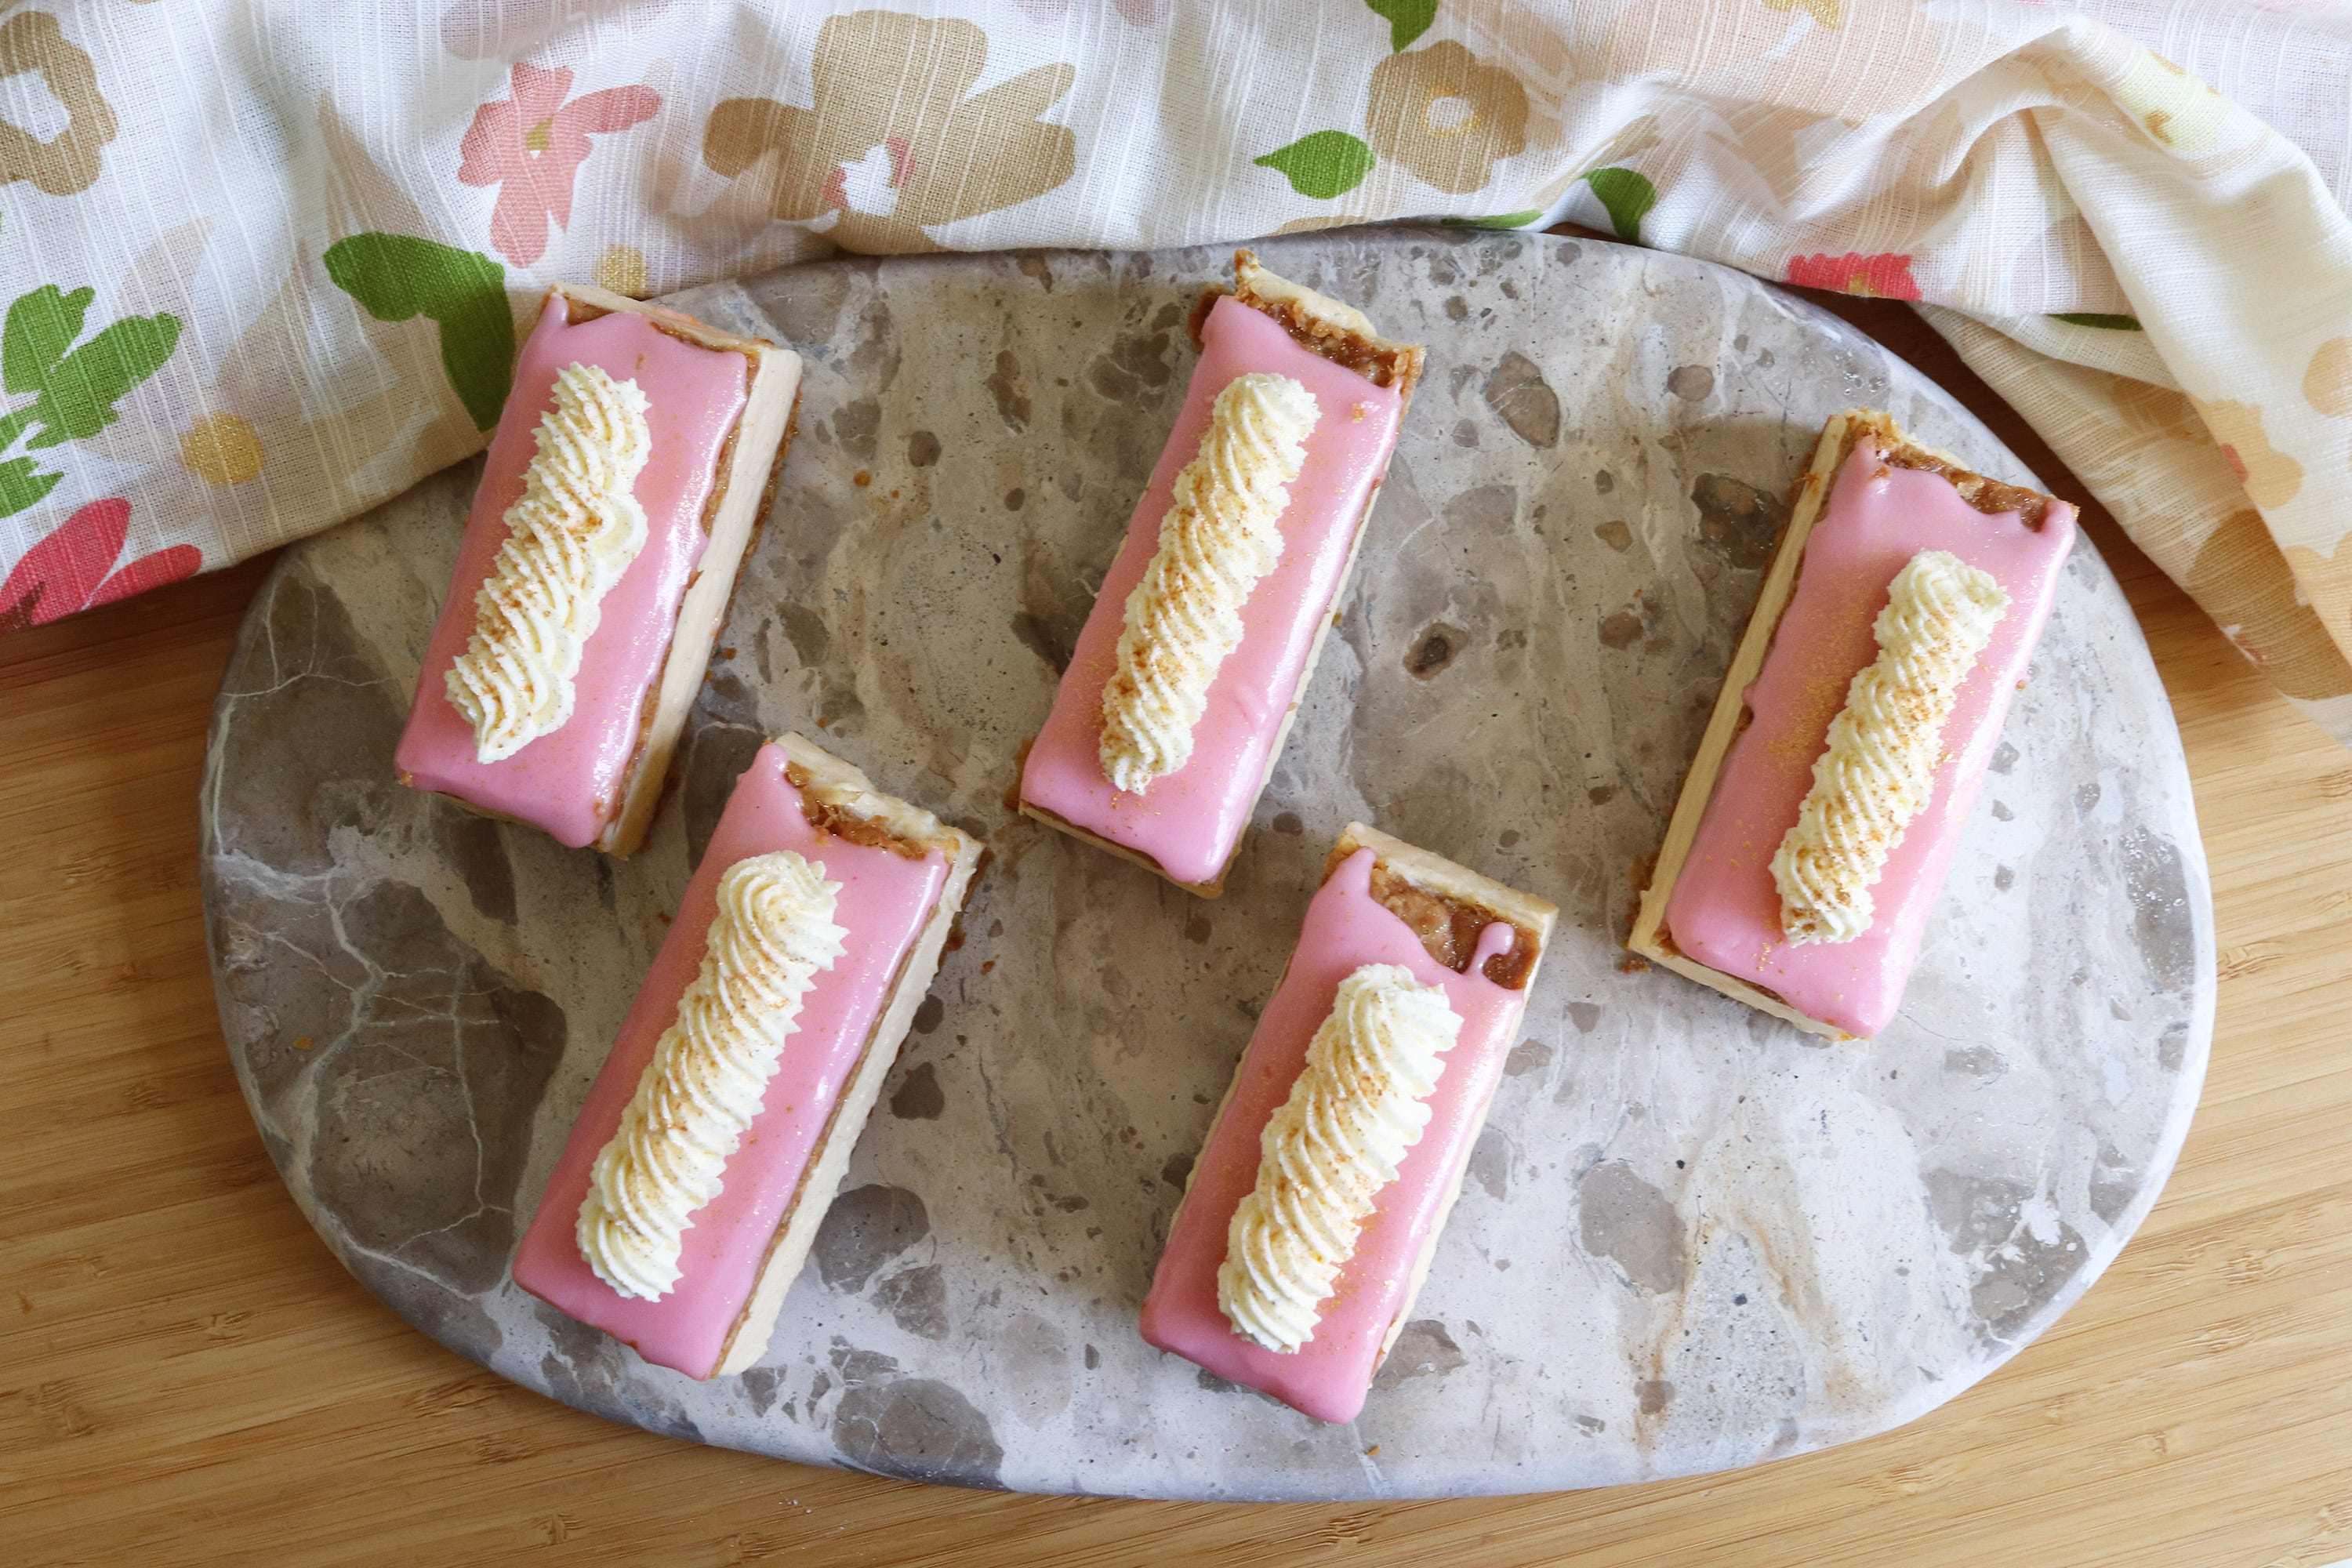
Day 2 - Slice the Tompouce
To slice the Tompouce, you’ll need:
a sharp serrated bread knife – to cut through the top layer of pastry
a large chef’s knife – to slice through the custard and bottom layer of pastry
a jug of hot water and paper towel to clean the knives between each slice. A hot, clean knife will result in neat, sharp slices.
Dip the serrated knife into the hot water, then wipe off the water. Use a gentle sawing motion to cut through the top layer of pastry. Switch to the chef’s knife, heating and drying the knife like you did with the serrated knife, and slice through the custard and base layer of pastry. Repeat these steps until you have cut the Tompouce into 10 rectangular slices.
Day 2 - Final preparation
To make the Chantilly Cream, place all the ingredients into a medium bowl and whisk to stiff peaks. Transfer to a piping bag fitted with a star nozzle and pipe a swirl of cream down the centre of each slice. Dust with some gold lustre dust for some extra razzle dazzle. Keep in the fridge until you’re ready to serve.
Tompoucen are best eaten on the day, but will keep in an airtight container in the fridge for about three days. However, the pastry will become softer over time.
Stay sweet
Adam x
I am drawn to any vehicle to get custard into my mouth, and this may be the ultimate.
Wow, that looks incredible! And you've laid out all the steps so thoughtfully, thank you ☺️.
We probably won't try making it ourselves - when it comes to sweets, we're too lazy to do much more than an old-fashioned Eve's Pud 😝.
But we're passing the recipe to a friend who loves trying out fun new desserts (and hopefully we'll get a few slices).